| [Run Train (Rail / Station / Train)] |
TOP PAGE |
|
|
|
|
|
|
| Headshunt |
|
|
|
Headshunt is a method to detach the head of a steam locomotive and then attach it to the tail.
Locomotive has only 1 cab. To make it run at its maximum speed after you change the running direction with turntable, detach the head and attach it to the tail. |
 |
Headshunt can be done only for the trains whose speed is different between forward and backward running.
*The following cars can be used for headshunt in [Custom].
[Cars available for headshunt]
JNR Class C11 207
Class ED79 + 50 Series
Class C57 + 12 Series
Class D51 + 12 Series
Class EF81 + 24 Series "Twilight Express"
Class EF66 + 14 Series
DC4 - ARTDINK
EC6 - ARTDINK
A-STEAM - ARTDINK |
|
|
| Configuration of headshunt |
|
|
For doing headshunt, you have to make a route that links one of the ends of a platform and the opposite end. It enables you to move the head car to the tail of the train.
Headshunt will be also done when a locomotive runs backwards and then stops at a station which the route is already set. |
|
|
1. Hover the cursor over the station you want to do headshunt. And then press the △ button or click on the station. After that, open [Station Settings].
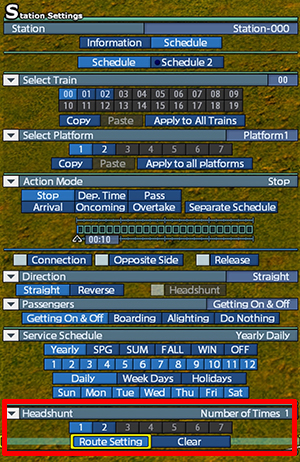
2. Show the details of [Headshunt] at the bottom. Select the platform to change settings, and select [Route Setting]. And then, the screen changes to the headshunt&route settings mode. |
|

|
3. From the platform you want to change settings, move the cursor or mouse to the left or right over a rail you want to change. And then, you will see the rail turns yellow. It means that you can select the rail to change its settings. Press the × button or left click on the yellow rail, and it will turn blue which means the rail is selected.
You can press the ○ button or right lick to undo. |
 |
4. Lay a route so that the cursor goes around the rail and comes back to the point where you started laying the route. Make sure it will come back to the opposite end of the platform against where you start laying.
e.g.) If you start laying a route from the right end of the platform, move the cursor to connect the route to the left end of the platform. |
 |
 |
|
|
| 5. Connect the route so that it turns blue. And then, the [Set] button will be highlighted to tell you that it is available. Finish the route setting by selecting the [Set] button. |
|

|
|
|
6. Buy a vehicle which you can headshunt. And put it on the new rail.
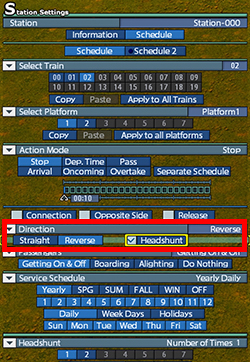
7. Go to [Station Settings] > [Direction], and check [Headshunt]. If already the route is set and the vehicle is selected, [Headshunt] will be highlighted as it is available. |
|

|
|
|
| Notes for Headshunt |
|
|
- You cannot make headshunt function enable for stations of origin and roundhouses.
- Upon route setting, you have limits for the length of the routes. However, you do not have limits for the number of route setting points.
- When the lead car and follower car of a train have a space in between them, sometimes another car goes into the space. If this happens while you are doing headshunt, the cars will be stopped. In this situation, you have to remove either of the lead or follower car.
- Headshunt will be done automatically while Drive Mode.
- Here is an example that we fail at headshunt. the length of the rail next to the station is shorter than the train. In this case, the system will recognize the train as it is not coming out of the station.
- You can finish the settings mode with your controller before you completing making a headshunt route. To do so, input a direction with direction keys first. Show the cursor at [Cancel] at the top left. And then, press × button.
- When you use your controller to show the height bar while setting a headshunt route, you will see the cursor on the bar. You may want to move the cursor from there to either [Set] or [Cancel] in the route setting mode at the top left. To do so, you have to move the left stick first, and then input a direction upward or leftward with the direction keys. If you want to move the cursor back to the height bar, try opening and closing the bar, or move the left stick first and then input a direction downward or rightward with the direction keys. |
|
|
© 2010-2020 ARTDINK. All Rights Reserved.
*Please enable JavaScript in your browser to view all content on this site. |


